![]() Note: additional information on the subject contained here can be obtained from an instructional video clip
Note: additional information on the subject contained here can be obtained from an instructional video clip ![]() at the form.suite4.net web site.
at the form.suite4.net web site.
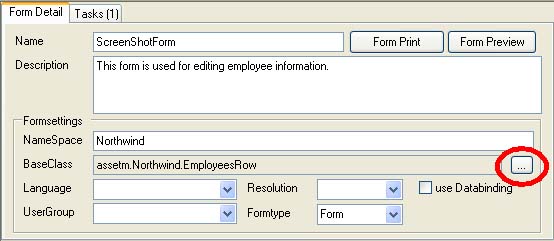
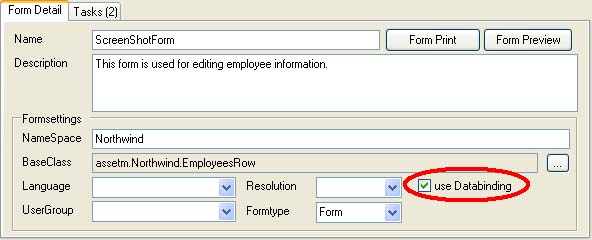
You can bind business objects of your application to a form in a form.suite4.net project. When the code for the form is generated, form.suite4.net includes code statements based on your preferred data binding method (see below).
Note: form.suite4.net concerns itself only with the presentation layer of .NET applications. Therefore, even though the code generation engine takes care of setting control property values to business object property values, you are still responsible for retrieving an instance of the business class from lower application layers and storing it back to the data store once editing of the data is complete.
s supports two different approaches to binding a business object to a form. They differ in the generated code and are based on the two most common scenarious found in working with data in a .NET environment:
myControl.Text = myBusinessObject.MyProperty) that assign business object properties to control property values. form.suite4.net's code generation engine comes in very handy here, as the "typing" is delegated to the tool — permitting the developer to concentrate on more important tasks.myControl.DataBindings.Add(…) and related operations. Microsoft's recommended approach. Easy to use for simple data manipulation operations.This sample excerpt shows the code generation engine's output for binding a business object to form control properties using the first (manual) approach:
public void InitializeDataSource(assetm.Northwind.EmployeesRow employeesRowdata)
{
	this.SuspendLayout();
	this.Save();
	this._IsInitializing = true;
	this.Reset();
	this._EmployeesRowdata = employeesRowdata;
	if((this._EmployeesRowdata != null))
	{
		this.txtEmployeeID.Text = this._EmployeesRowdata.EmployeeID.ToString();
		this.txtTitleOfCourtesy.Text = this._EmployeesRowdata.TitleOfCourtesy;
		this.txtTitle.Text = this._EmployeesRowdata.Title;
		this.txtCountry.Text = this._EmployeesRowdata.Country;
		this.txtRegion.Text = this._EmployeesRowdata.Region;
		this.txtPostalCode.Text = this._EmployeesRowdata.PostalCode;
		this.txtCity.Text = this._EmployeesRowdata.City;
		this.txtStreet.Text = this._EmployeesRowdata.Address;
		this.txtFirstName.Text = this._EmployeesRowdata.FirstName;
		this.txtLastName.Text = this._EmployeesRowdata.LastName;
	} // end if((this._EmployeesRowdata != null))
	this.ResumeLayout(false);
	this._IsInitializing = false;
	this._IsDirty = false;
} // end public void InitializeDataSource(assetm.Northwind.EmployeesRow employeesRowdata)
This is the output for the same form when using Windows Forms databinding:
public void InitializeDataSource(assetm.Northwind.EmployeesRow employeesRowdata)
{
	this.SuspendLayout();
	// Clear DataBindings for all components.
	this.txtTitleOfCourtesy.DataBindings.Clear();
	this.txtTitle.DataBindings.Clear();
	this.txtCountry.DataBindings.Clear();
	this.txtRegion.DataBindings.Clear();
	this.txtPostalCode.DataBindings.Clear();
	this.txtCity.DataBindings.Clear();
	this.txtStreet.DataBindings.Clear();
	this.txtFirstName.DataBindings.Clear();
	this.txtLastName.DataBindings.Clear();
	this._EmployeesRowdata = employeesRowdata;
	if((this._EmployeesRowdata != null))
	{
		this.txtTitleOfCourtesy.DataBindings.Add("Text", this._EmployeesRowdata, "TitleOfCourtesy");
		this.txtTitle.DataBindings.Add("Text", this._EmployeesRowdata, "Title");
		this.txtCountry.DataBindings.Add("Text", this._EmployeesRowdata, "Country");
		this.txtRegion.DataBindings.Add("Text", this._EmployeesRowdata, "Region");
		this.txtPostalCode.DataBindings.Add("Text", this._EmployeesRowdata, "PostalCode");
		this.txtCity.DataBindings.Add("Text", this._EmployeesRowdata, "City");
		this.txtStreet.DataBindings.Add("Text", this._EmployeesRowdata, "Address");
		this.txtFirstName.DataBindings.Add("Text", this._EmployeesRowdata, "FirstName");
		this.txtLastName.DataBindings.Add("Text", this._EmployeesRowdata, "LastName");
	} // end if((this._EmployeesRowdata != null))
	this.ResumeLayout(false);
} // end public void InitializeDataSource(assetm.Northwind.EmployeesRow employeesRowdata)
Depending on the selected approach, additional methods may be added to the form which perform functions such as:
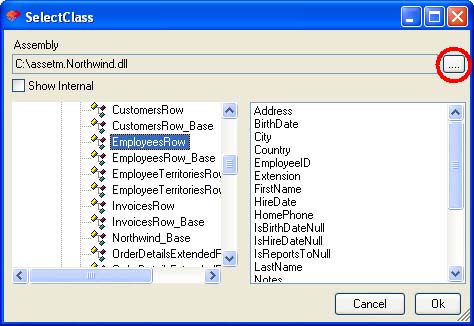
You can assign a business class to a form as follows: